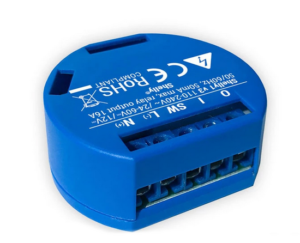
Fig: Shelly 1 (Shelly)
The Shelly 1 module is a small WiFi switch for home automation and can be integrated into flush-mounted boxes for light switches. The WiFi module in the Shelly 1 works with an ESP8266, which is popular among hobbyists. The WiFi switch can be operated with an app and the status of the switches can be queried. A relay with a single-pole NO contact is integrated into the switch, with which loads up to 3.5kW (230V AC, 16A) can be switched potential-free. It can also be used to switch loads in DC voltage circuits, but only up to 192W (12V DC, 16A) because the cable cross-sections of the connections are too small. The Shelly 1 can be supplied with 230V or with a DC voltage of 12V or 24V-60V. To do this, a jumper must be set internally. The quiescent power consumption is about 1W.
The Shelly 1 module can also be used via the cloud Amazon Alexa or Google Home can be controlled with voice commands. A cloud connection is not absolutely necessary. You can also control the Shelly module with HTTP commands. The article is about exactly that and how to do it with NodeRed.
In addition to the switching output (0 I), there are a number of other IO pins from the ESP8266 that can be used in your own extensions. For example, 1-Wire temperature sensors DS18B20 can be connected directly to the IO pins. The Shelly firmware supports these sensors without further changes and the readings are displayed on the web interface. The technical data are listed in brief below.
- Input voltage switchable via jumpers
- 110-230V ±10%, 50/60Hz AC
- 24-60Vdc
- 12Vdc
- Compatible with all major international voltage standards
- Maximum switching load: 16A, 110-265V, 50/60HZ AC
- Maximum switching load: 16A, 12V DC, 24-60V DC
- Operating temperature: -40 to +40°C
- Dimensions (LxWxH): 40 x 36 x 17mm
- Minimum mounting opening: Ø 50mm
- Wireless/Wi-Fi Protocol: 802.11 b/g/n, 2.4 GHz
- Radio range: up to 50 m in free field and up to 30 m indoors
- Power consumption idle mode: <1 W
- Extension port for digital IO signals (3.3V TTL level)
- 3.3V
- GND
- GPIO 0
- GPIO 1 (TXD)
- GPIO 3 (RXD)
Table of contents
Set Shelly to 12V supply
When delivered, the voltage selector is set to 230V AC. We need to put the jumper on the position for 12V according to the picture.
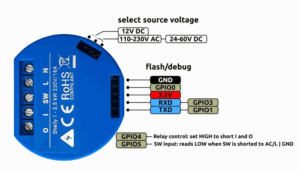
Fig: Meaning of the pin headers
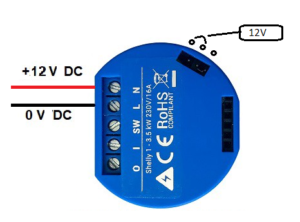
Fig: Assignment of the supply voltages for 12V
Bring Shelly 1 into your own network
How this works in detail is explained in Shelly–Documentation sufficiently well described. A fixed IP address is recommended for later work with NodeRed.
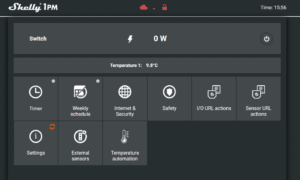
Fig: Start page
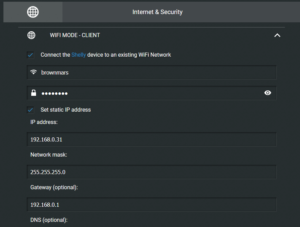
Fig: Internet & Security page
Danger! You have to be careful when entering the network parameters. If you entered the WiFi SSID or password incorrectly, you will lock yourself out and no longer be able to connect to Shelly. A hard reset to factory settings is only possible via a cumbersome procedure. To do this, you have to switch the power supply off and on again and then press the switch at the SW input 5 times within one minute. The right timing is a matter of luck and requires several attempts to be successful. In the worst case, the Shelly can no longer be activated and you have to flash the firmware again. How to do that is in this one Flash guide described.
Connect and configure temperature sensor
If the original Shelly firmware is used, this is always the case for using the DS18B20 temperature sensors Shelly temperature sensor addon necessary. The addon can be operated with both 12V and 230V and ensures that the connection wires of the sensors are galvanically isolated and no 230V are present there. In principle, up to 3 sensors can be connected in parallel and are automatically recognized by the firmware. The sensors are to be connected according to the wire colors.
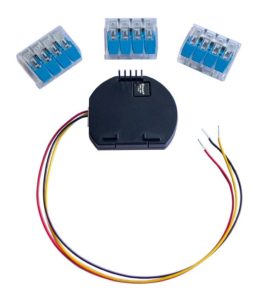
Fig. Shelly temperature sensor addon
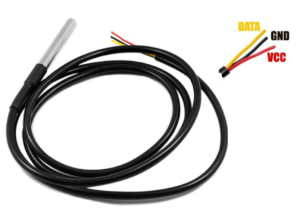
Fig. Temperature sensor DS18B20
If you also want to measure the humidity, you can use the DS18B20 sensor instead of the DHT22 (use AM2302). The DHT22 is connected in exactly the same way as the DS18B20. However, only one sensor can be integrated.
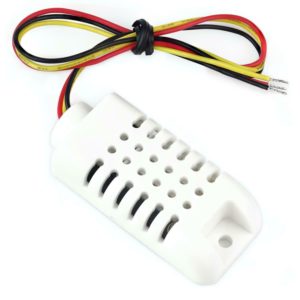
Fig. Sensor DHT22 (AM2302) for temperature and humidity
Connected sensors are recognized automatically and can be Temperature automation be configured.
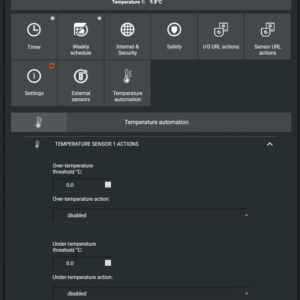
Fig: Temperature automation
When the Temperature addon is connected, you can already see a temperature display in Shelly's main window and the corresponding buttons appear. Under "Temperature Automation" you can set threshold values for the switching output of the Shelly relay.
Control over HTTP requests in NodeRed
The principle is to send it to the respective Shelly HTTP requests. The commands for this can be found in the online doc:
https://shelly-api-docs.shelly.cloud/gen1/#shelly1-shelly1pm
Here's how it works in Node Red:
The command to be used is generated as a string via an inject node, eg "on" to switch on. The httl command string is then assembled in a function node. To do this, use the url method of the msg object. So you can actively control the Shelly.
If you are not familiar with NodeRed, you should watch the NodeRed introductory videos. https://open-boat-projects.org/de/#NodeRed
function code
var x = msg.payload; //local variable for the given on/off string
var IP = “192.168.0.31”; // IP address of Shelly
msg.url= "http://" + IP + "/relay/0"; // Build string
msg.payload = "turn=" + x; // Add a switch command to the msg object's payload.
return msg;
reading the temperature
var IP = “192.168.0.31”; //so
msg.url= "http://" + IP + "/status/ext_temperature"; // Command string for reading the temperature.
return msg;
An http-request-node comes after the function node. It sends the command to Shelly. At the end of the HTTP request, another function node reads the temperature:
msg.payload = msg.payload.ext_temperature[0].tC;
return msg;
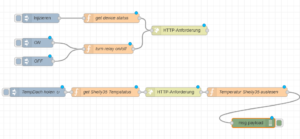
Fig: Function node in NodeRed
Below is the function code of the image above. If you don't feel like typing, you can copy the function code using the following link and integrate it into a flow.
[{"id":"2d5582c5.552e9e","type":"tab","label":"Flow2″,"disabled":false,"info":""},{"id":"3f56ec23.9d8f d4″,"type":"inject","z":"2d5582c5.552e9e","name":"","topic":"","payload":"","payloadType":"str","repea t":"","crontab":"","once":false,"onceDelay":0.1,"x":160,"y":100,"wires":[["daf4fe1d.bb8a58"]]},{"id":" 34d63f43.6c2678″,"type":"inject","z":"2d5582c5.552e9e","name":"ON","topic":"","payload":"on","payloadTy pe":"str","repeat":"","crontab":"","once":false,"onceDelay":0.1,"x":150,"y":180,"wires":[["3c697908.5e e006"]]},{"id":"b5c39d9.b98e4e","type":"inject","z":"2d5582c5.552e9e","name":"OFF","topic":"","payload ":"off","payloadType":"str","repeat":"","crontab":"","once":false,"onceDelay":0.1,"x":150,"y":240,"we es":[["3c697908.5ee006"]]},{"id":"3c697908.5ee006″,"type":"function","z":"2d5582c5.552e9e","name":"turn relay on/off","func":"var x = msg.payload;\nvar IP = \"192.168.0.31\";\nmsg.url= \"http://\"+ IP+ \"/relay/0\";\n\nmsg.payload = \"turn=\" + x;\nreturnmsg;","outputs":1,"noerr":0,"x":380,"y":200,"wires":[["1e5b82ec.3dbaed "]]},{"id":"daf4fe1d.bb8a58″,"type":"function","z":"2d5582c5.552e9e","name":"get device status","func":"\nvar IP =\“192.168.0.30\“;\nmsg.url= \“http://\“+ IP + \"/status\";\n\n\nreturnmsg;","outputs":1,"noerr":0,"x":390,"y":100,"wires":[["1e5b82ec.3dbaed"]] },{"id":"1e5b82ec.3dbaed","type":"httprequest","z":"2d5582c5.552e9e","name":"","method":"POST","re t":"obj","paytoqs":false,"url":"","tls":"","proxy":"","authType":"","x":610,"y":140,"wires":[[]]} ,{"id":"36de9059.095b5″,"type":"debug","z":"2d5582c5.552e9e","name":"","active":true,"tosidebar":t rue,"console":false,"tostatus":false,"complete":"false","x":850,"y":440,"wires":[]},{"id":"9aa0c7 8f.df782″,"type":"inject","z":"2d5582c5.552e9e","name":"TempDachholt","topic":"","payload":"","pa yloadType":"date","repeat":"600″,"crontab":"","once":true,"onceDelay":0.1,"x":150,"y":340,"wires": [["66bbd8ad.fc06d8"]]},{"id":"66bbd8ad.fc06d8″,"type":"function","z":"2d5582c5.552e9e","name":"get Shelly35 Tempstatus","func":"\nvar IP =\"192.168.0.31\";\nmsg.url= \"http://\"+ IP + \"/status/ext_temperature\";\n\nreturnmsg;","outputs":1,"noerr":0,"x":370,"y":340,"wires":[["92dd821 6.8ad5b"]]},{"id":"92dd8216.8ad5b","type":"httprequest","z":"2d5582c5.552e9e","name":"","method":"POS T","ret":"obj","paytoqs":false,"url":"","tls":"","proxy":"","authType":"","x":590,"y":340,"wires":[[ "f4cbc3c1.b9e0c"]]},{"id":"f4cbc3c1.b9e0c","type":"function","z":"2d5582c5.552e9e","name":"Temperature Shelly35auslesen","func":"msg.payload = msg.payload.ext_temperature[0].tC;\nreturnmsg;","outputs":1,"noerr":0,"x":830,"y":340,"wires":[["36de9059.095b5"]]}]
Fig: Function code of the flow
Additional information
A few other functions on board can be automated in a similar way, such as heating, ventilation, battery charging or bilge drainage. Anyone who has activated the cloud connection can then also control all functions remotely via the Internet and, if necessary, be informed by e-mail. For the Shelly 1 can be found at Thingiverse 3D printing templates for a DIN rail holder. In this way, the installation can be carried out professionally in a sub-installation.
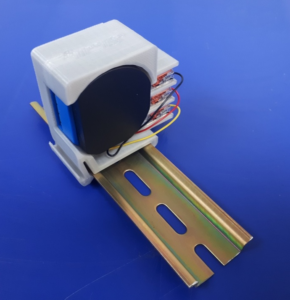
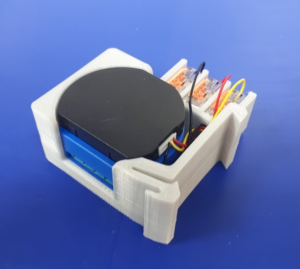
Fig: DIN rail holder for Shelly 1 with temperature addon module
Here is some additional information about Shelly: