First of all, a few important notes that you should definitely pay attention to.
![]()
https://www.segeln-forum.de/thread/73307-multifunktionsdisplay-diy/
open boat projects LIVE:
Video presentation in German on the OBP 60 multifunctional display (45min presentation, 30min discussion)
After we have dealt with the M5Stack as a multifunction display in 2019 and could show and were able to show some applications at Boot 2020, we are taking a new approach to a new multifunction display here. The M5Stack was not bad, but was subject to certain limitations for which some marine applications were not possible.
The disadvantages of the M5Stack include:
- Display that is too small and not suitable for sunlight
- Only 3 control buttons
- Not waterproof
- Too low battery power for standalone applications
However, some useful applications could be implemented:
The M5Stack is very flexible to use and well documented, but could not convince in the large number of marine applications. Following the widely used and popular ST60 series of instruments from Raymarine, a new attempt was made to build a more suitable multifunction display. In terms of housing dimensions, the new multifunction display is identical to the ST60 device series. Thus, the multifunction display can serve as a direct replacement for old and defective devices. By supporting old bus systems like NMEA0183 and SeaTalk, a bridge to the new world with NMEA2000 is provided, so that older systems can still be operated. The WLAN capability also allows to go completely new ways in signal transmission with connection e.g. to SignalK. Commercially there is a good selection of multifunction displays, but they are very limited in terms of expandability and adaptability to individual needs. You can only do things with the multifunction display for which the manufacturer has provided functions. Unfortunately, nothing can be modified or extended by the user. The goal of the whole development should be an open system where the user has access to all functions of the multifunctional display and can implement his own ideas by adapting the software and additional hardware. The standard electronics is designed in such a way that in the future it will be possible to replace it by other housings of other device series. Thus, maximum flexibility and openness is given.
Currently, the project is still in development.
Table of contents
specification
In the design of the new display, emphasis was placed on the following points:
- Standard size for a multifunctional display (110 x 110 mm)
- Suitable for daylight
- Waterproof
- 6 keys
- Support of the following bus systems:
- NMEA0183
- NMEA2000
- SeaTalk
- I2C
- 1Wire
- Low power consumption
- WiFi-capable
- Bluetooth-capable
- Expandability via I2C bus and 1Wire
- Hardware extensions via I / O port
- Autarkic usable with battery pack for several days
- Standard electronics for compatibility with other device series (NASA, Clipper, Navman, etc...)
- Freely designable housing and therefore adaptable to other device series
- Openness (OpenSource, OpenHardware)
- Rebuildability with hobby means due to simple construction
- Use of ready-made electronic modules
- Adaptability to different needs
- Software library for the Arduino IDE (similar to M5Stack)
- Software updates via micro USB and WiFi
Video of the construction of the multifunctional display
implementation
Specifically, the multifunction display was implemented with the following components and the following specification:
- NodeMCU-32S as CPU unit
- E-Ink display (400 x 300 pixels, 4.2″, suitable for daylight)
- SeaTalk (full duplex)
- NMEA 0183 (RX or TX, configurable)
- SeaTalk (full duplex)
- I2C
- 1Wire
- 8x I / O expansion port (internal)
- 6x touch keys (swipe capable)
- 2x digital out (12V, 4A)
- 2x digital in (12V)
- 2x Analog In (tank sensor 0...180 Ohm, battery etc.)
- Battery monitor (12V voltage measurement)
- Acoustic signal generator (buzzer)
- Optical signal generator (red LED)
- LED display lighting (red LEDs)
- BME280 (temperature, air pressure, humidity)
- GPS receiver (NEO-6M with internal mini GPS antenna)
- WiFi 2.4GHz (HTTP, TCP)
- Bluetooth
- Power consumption approx. 2W (without backlight)
- Power consumption approx. 3W (with backlight)
- Battery deep discharge protection <9.0V (Deep Sleep, 0.2W)
- Low Power Mode (Deep Sleep with WeakUp 0.2W, 15mA @ 12V)
- Connections for optional LiPo battery pack (50Wh, approx. 24h self-sufficient)
- Extension connections 8x digital IO, RX, TX, I2C, 5V 0.5A, GND
The next figure shows a schematic of the function blocks and their interconnection.
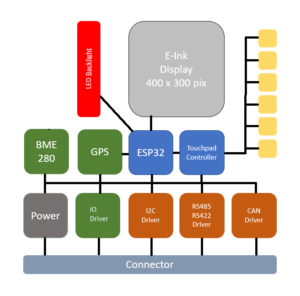
Fig. Functional diagram
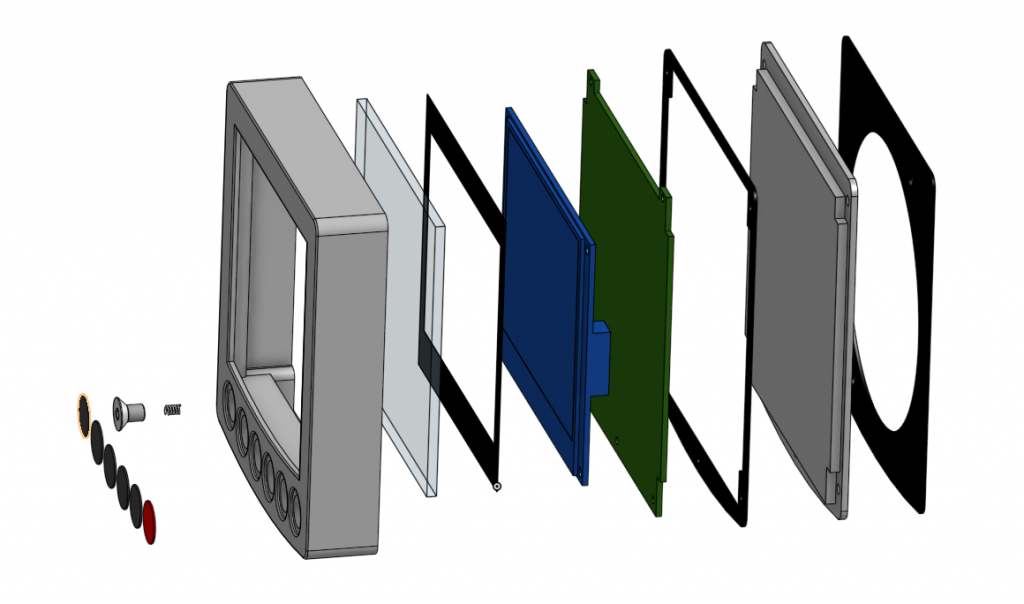
The board is equipped with various SMD components and will therefore no longer be solderable without further ado. Some electronic modules can be assembled individually ( E-Ink-Display, NodeMCU-32S, BME280, GPS) The board will be offered for sale later fully assembled without electronic modules.
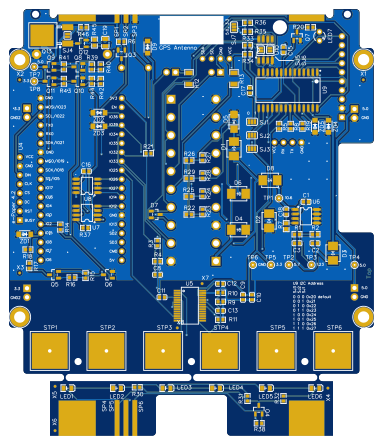
Fig. Front side of the circuit board
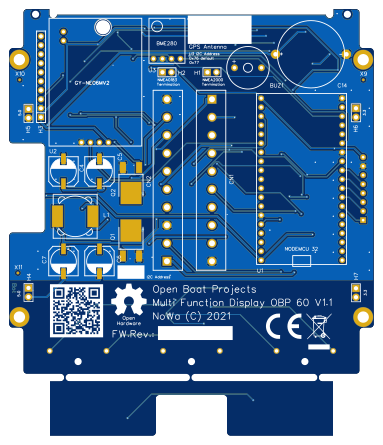
Fig. Rear of the circuit board
![]()
Fig. Electronics front
![]()
Fig. Electronics with e-ink display
![]()
Fig. Electronics rear
![]()
Fig. Front housing with display disc and contact springs for keyboard
![]()
Fig. Rear of the MFD
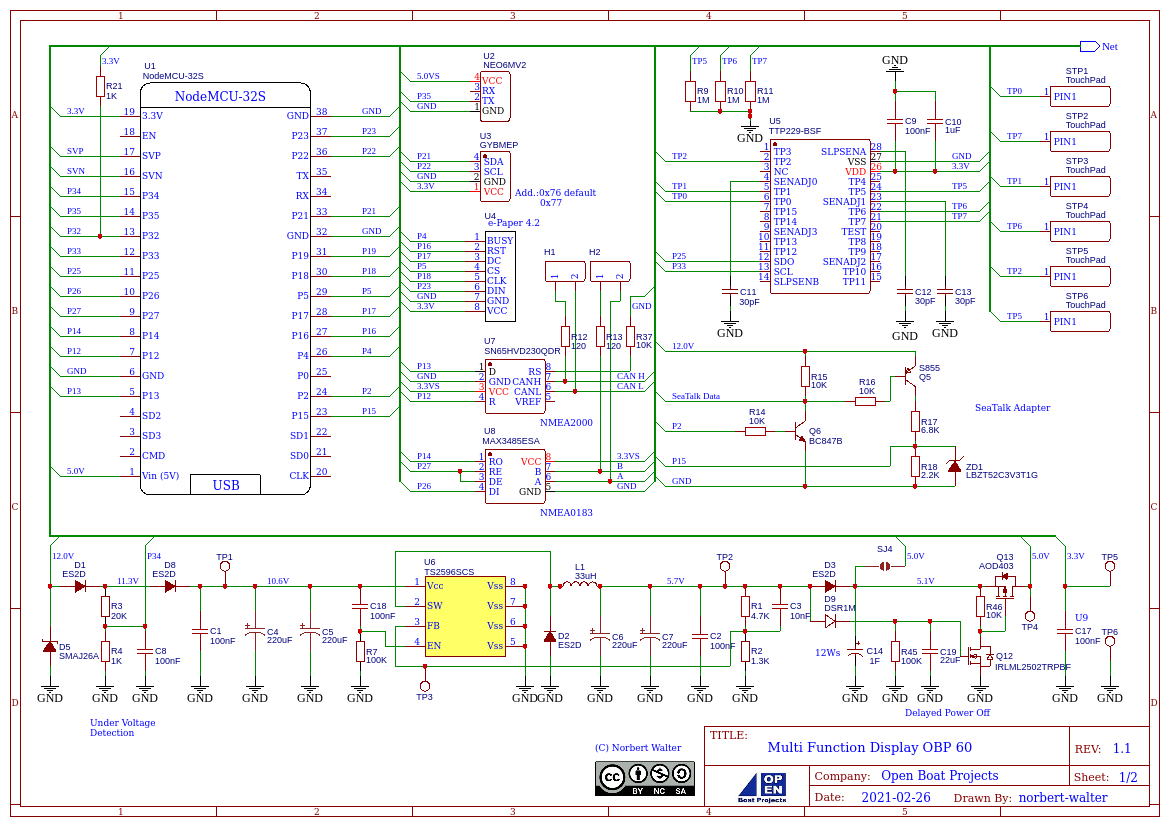
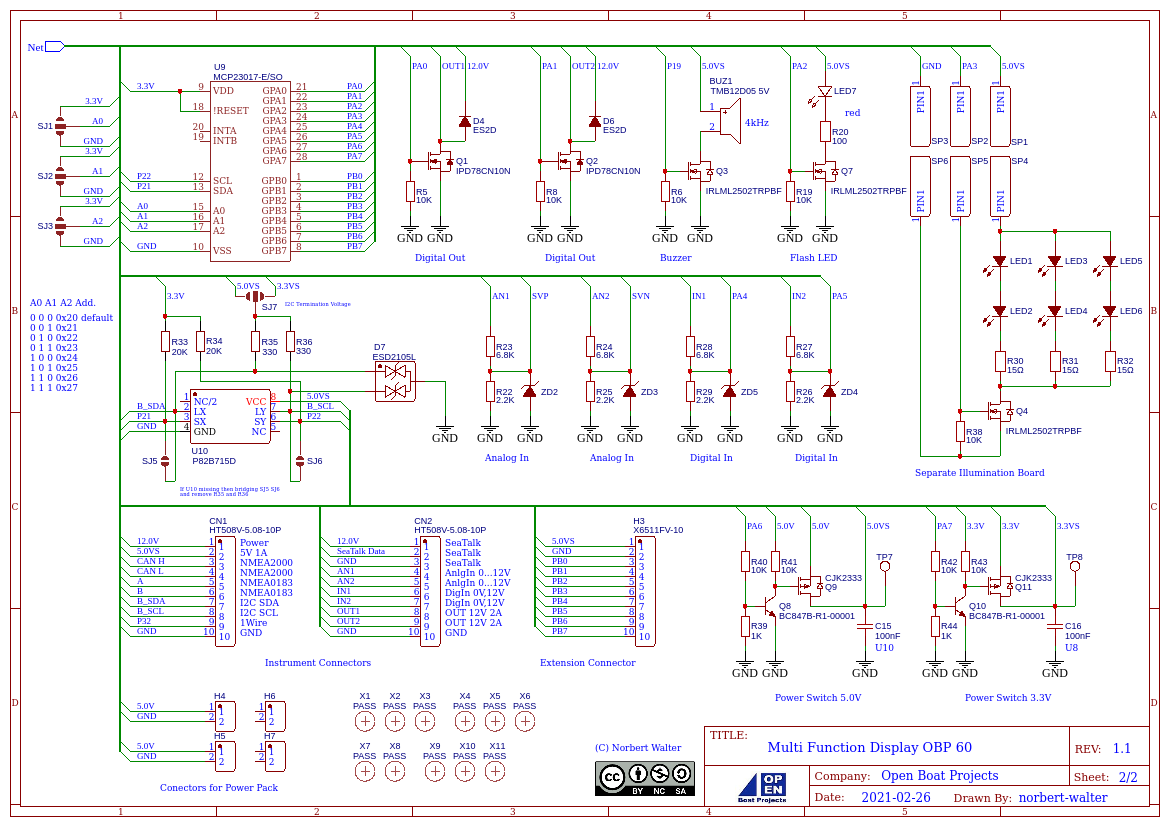
Circuit diagram
Possible uses
In principle, the following things could be realized with the multifunction display:
- Instrument display of bus data from NMEA2000, NMEA0183, SeaTalk, WiFi
- Gateway between NMEA2000, NMEA0183 and SeaTalk
- Export of all sensor data via WiFi for tablets
- SignalK connection
- Weather display with weather history (BME280)
- GPS display
- Current position display in sea chart (with internet connection via OpenSeaMap)
- Wind display (true wind)
- Simple GPS autopilot (with DC motor as actuator)
- Anchor watch
- Battery monitor (with I2C current sensor also charge monitor)
- Solar monitor (with I2C current sensor)
- Motor diagnostics (temperature, speed)
- Speedometer (with common pulse sensor)
- AIS display graphically (with AIS receiver)
- Info display for email, messenger services
- Display for clock (UTC, local time), date, sunrise and sunset
- Sailing timer (distance and time to start line)
- Watch timer
- Next Treckpoint indicator with XTR and audible alarm
- Tank level indicator
- Bilge monitoring with pump control
- Alarm system with notification via WLAN including GPS tracker
- Weather forecast (with internet connection)
- Boat automation (with Sonoff components)
- Reception of commands from a Bluetooth remote control with
- Receiving Bluetooth wind sensor signals from Raymarine (if the signals can be decoded)
- Control of audio media players (DLNA)
- Firmware update via WiFi
- and, and, and ....
In order to realize the possible applications, however, software is required that still has to be programmed and transferred to the multifunction display in the form of firmware. However, the firmware will not be able to implement all functions at the same time. Depending on the application, a suitable firmware is loaded onto the device via USB or WiFi connection and can then implement one or more functions. We hope that the multifunction display will find a lot of interest and that some will participate in the software development.
Current status
In the meantime, the first firmware has now been implemented. Thanks to the great software project NMEA2000 gateways from Andreas I was able to use core software that already covers many parts that I also needed for my firmware. The NMEA2000 gateway contains a complete gateway for converting the data between NMEA2000 and NMEA0183 and supports the transmission layers CAN bus, RS485, RS422, TCP and USB serial. The core software was written by Andreas for ESP32 microcontrollers in C ++ and was originally for one M5Stack Atom thought. Since an ESP32 is also used as a CPU in the multifunction display, I decided to program extensions for Andreas Gateway software. This allows the hardware functionalities of the multifunction display to be used and data to be displayed. Andreas had to add various extensions and software functionalities in his software for me. Within a short time, a very useful firmware for the multifunction display was created with the following functionality:
- Instrument display of bus data from NMEA2000, NMEA0183, WiFi, USB
- Gateway between NMEA2000, NMEA0183
- Generation of any user-defined XDR data for NMEA0183
- WiFi access point for configuration
- Web user interface (password protected)
- Status line in the display
- Red background lighting that can be switched on and off
- Simple dashboard for displaying and diagnosing bus data
- Firmware update via WiFi and USB
- Export of all sensor data via WiFi for tablets
- Weather display (BME280)
- GPS display
- Simple battery monitor (voltage display)
Currently, 4 display pages can be freely parameterized through the web configuration, which can be called up via swipe gestures. There are different types of display pages defined as follows:
- Freely configurable display pages
- On-value display
- Two-value display
- Three value display
- Four-value display
- Non-configurable display pages
- Battery voltage indicator
- Battery usage indicator
- Solar power indicator
- Generator power indicator
- True Wind, Apparent Wind with Instrument Gauge
- Time, date, sunrise, sunset
- rudder angle
- roll pitch
- keel tilt
- DST810 (depth, speed, water temperature, distance)
All available bus data can then be brought to the display pages. The current firmware can be found at GitHub: https://github.com/norbert-walter/esp32-nmea2000
A detailed description of how to install the firmware is in the project for NMEA2000 gateway to find.
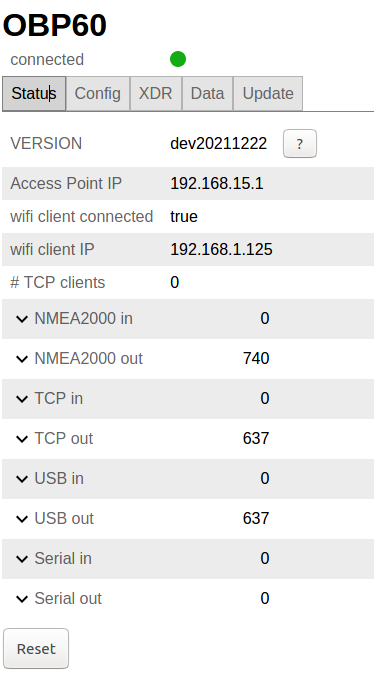
Fig.Status
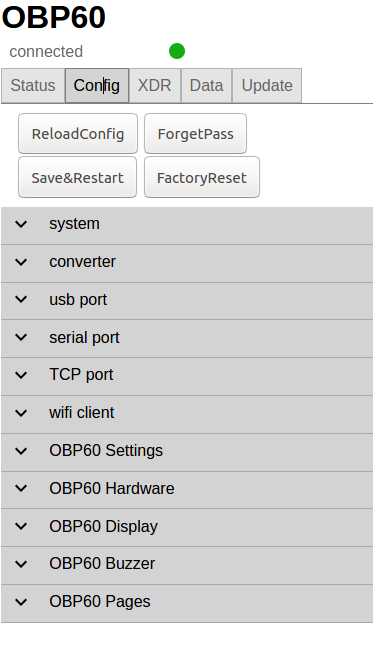
Fig.Config
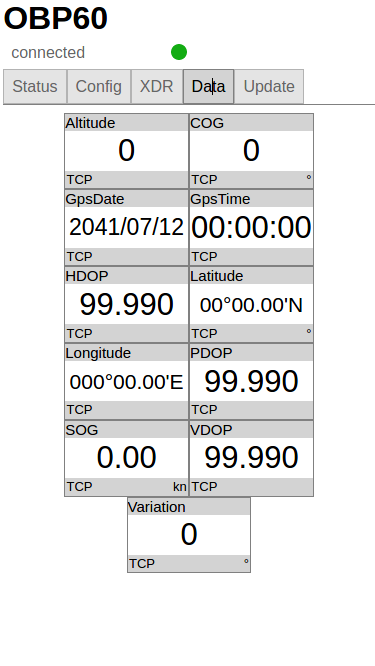
Fig.Data
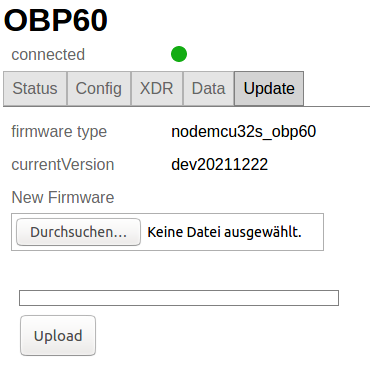
Fig.Update
One of the biggest hurdles was the lighting of the e-ink display for night operation. It can only be illuminated from the front and requires special front glass that deflects the light coupled into the side via LEDs onto the e-ink display by 90 °. Making it yourself as a maker was not that easy. Industrially manufactured e-ink displays with lighting use front glasses that are microstructured. Such glasses cannot be bought in normal specialist shops. The aim was to apply the microstructuring yourself with the help of a laser. Laser devices that can be bought for makers do not have such a high resolution and we had to make some compromises with regard to efficiency and visibility. The best results came after many attempts a dithered laser point laser with an introduced point density gradient. A laser point is a disruptive body on the surface of the windshield, which deflects the light in all directions. The efficiency is not particularly good, since the light cannot be deflected in a directional manner and is only emitted from all sides in the room, so that only a small part of the scattered light can be used. We were able to achieve a minimum point size of approx. 200 µm with the laser. To create a gradient, we used a graphics program and created a gray level wedge with a 0… 12% gray component and then dithered it. The image resolution was 600 dpi. We used this image template for the laser process. Due to the high number of points, the laser process with a laser with XY traversing unit took a good 45 minutes, as the laser had to build up the image line by line. The result is impressive. The light is deflected as desired onto the surface of the e-ink display.
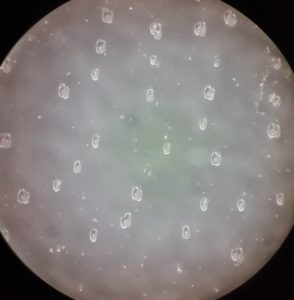
Fig.Laser points under the microscope (1% gray portion)

Fig .: Dithered image template for the laser process
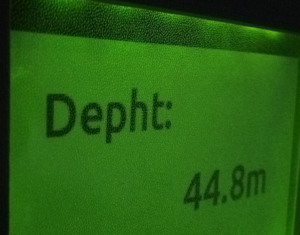
Fig. E-Ink front lighting
A 3 mm thick Plexiglas pane is used as the front pane. The laser-structured side is on the outside. Alternatively, you can also use special Plexiglas panes for the advertising industry. This plexiglass is used to shine through advertising posters from behind and is often used in showcases or for illuminated pictures. This special Plexiglas is transparent and you can couple light into the front edge of the pane from the side, which is then scattered. The entire volume of the plexiglass acts as a diffuser. The Röhm company produces such special glasses under the name Plexiglas LED plate 0E010SM (4 mm). However, the lighting results are not as good as with the laser-structured windshield. The contrast of the illuminated display is too low and the picture is noisy.

Fig. Left laser-structured disk, right Röhm disk
In addition to protecting and lighting, the plexiglass pane has another task. It should protect the e-ink display from UV radiation (UVB, UVC) so that the display does not go blind. According to the specification, the e-ink display must not be exposed to direct sunlight or UV light. The reason for this is that the small pre-charged color balls in the display lose their charge due to UV radiation and can then no longer be aligned. Ordinary plexiglass has the useful property of suppressing UV light.
![]()
Fig. UV transmission of different glasses (2nd from plexiglass)
pictures
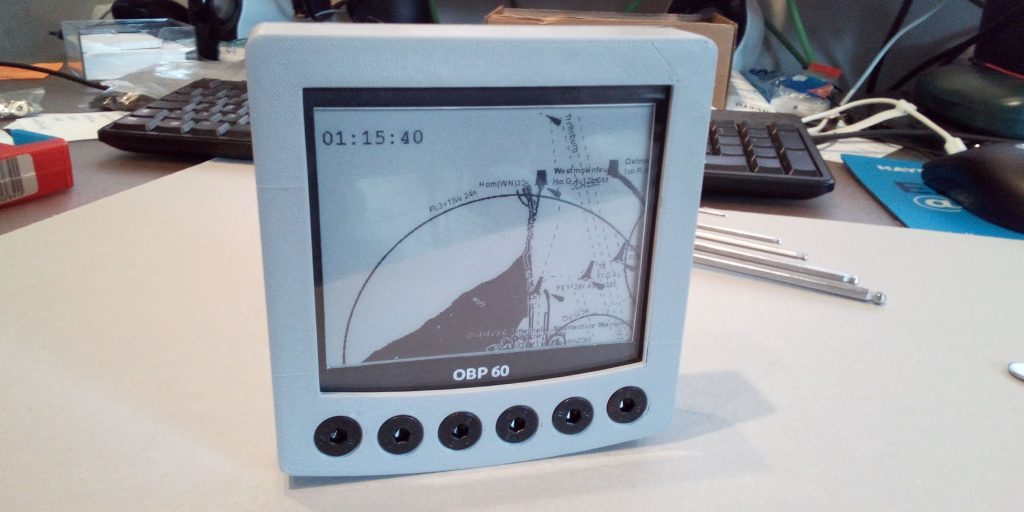
Fig.Multifunctional display with loaded demo nautical chart
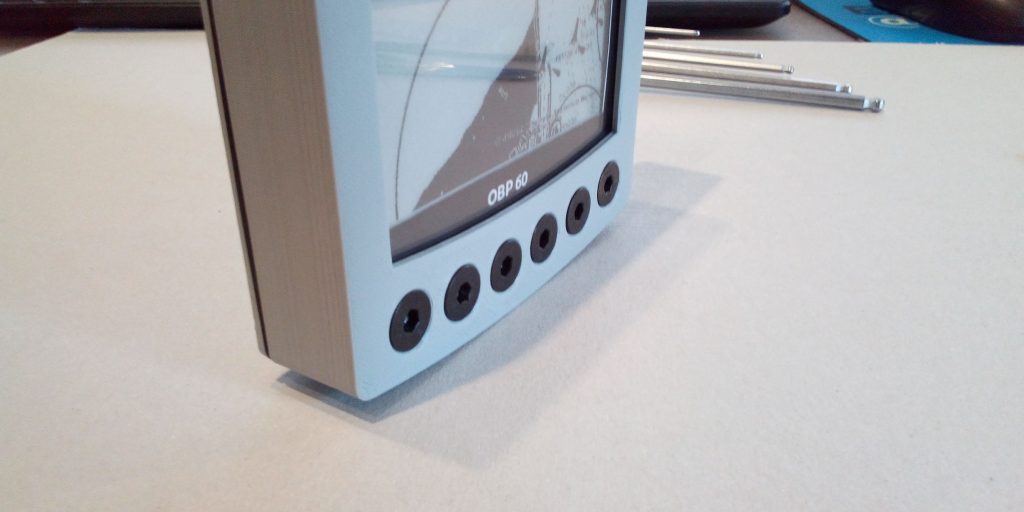
Fig. Allen countersunk head screws as touch buttons
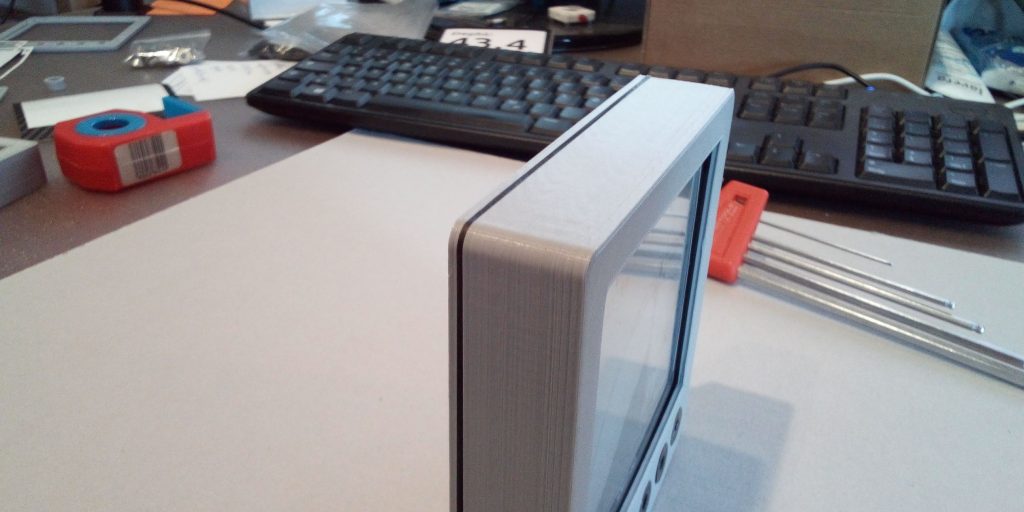
Fig. Viton seal as moisture protection
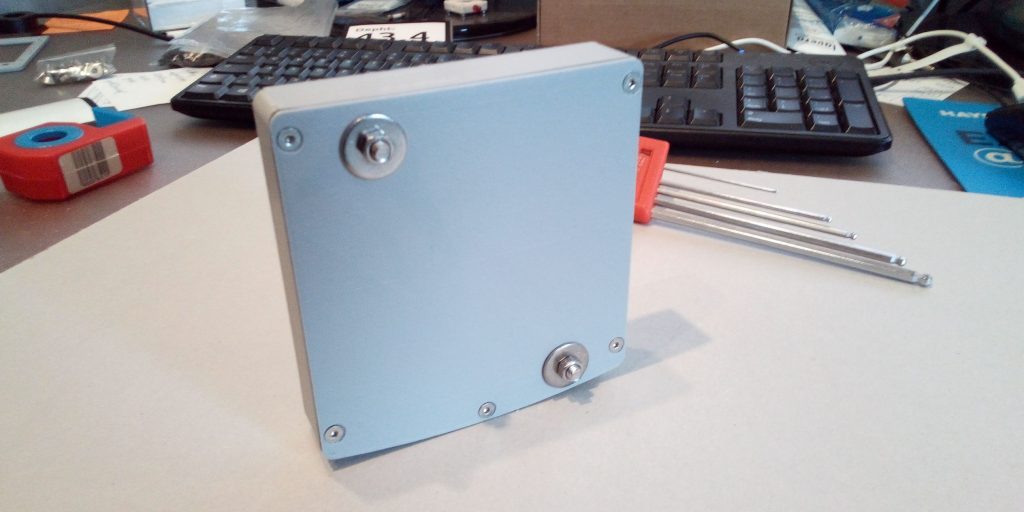
Fig.Raymarine standard mountings
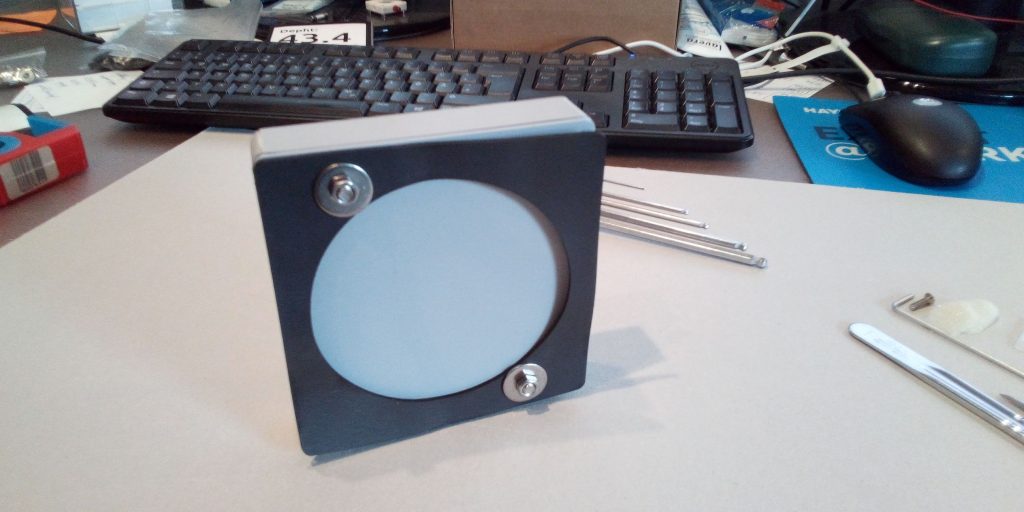
Fig. Closing seal opposite the cockpit wall with 2mm thick Mosgummi
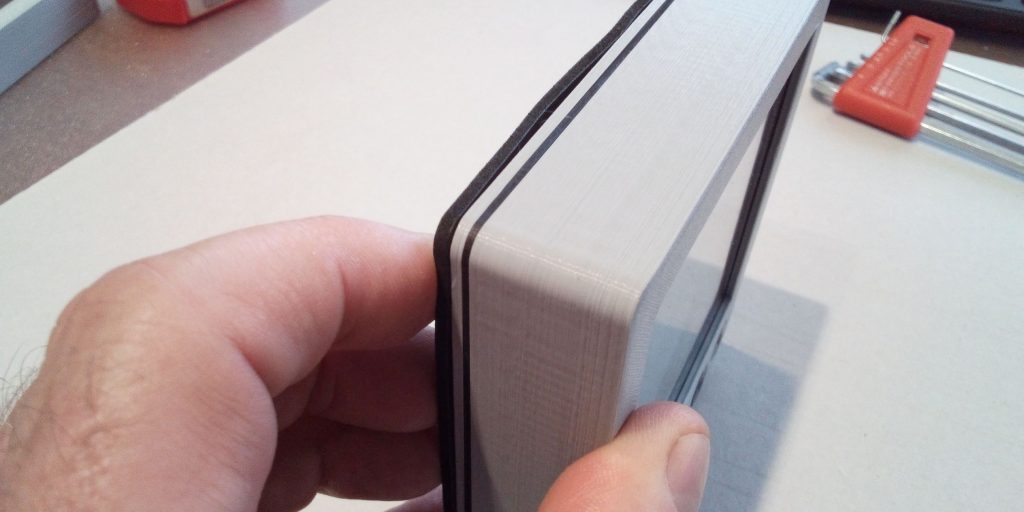
Fig. Total thickness corresponds to the original
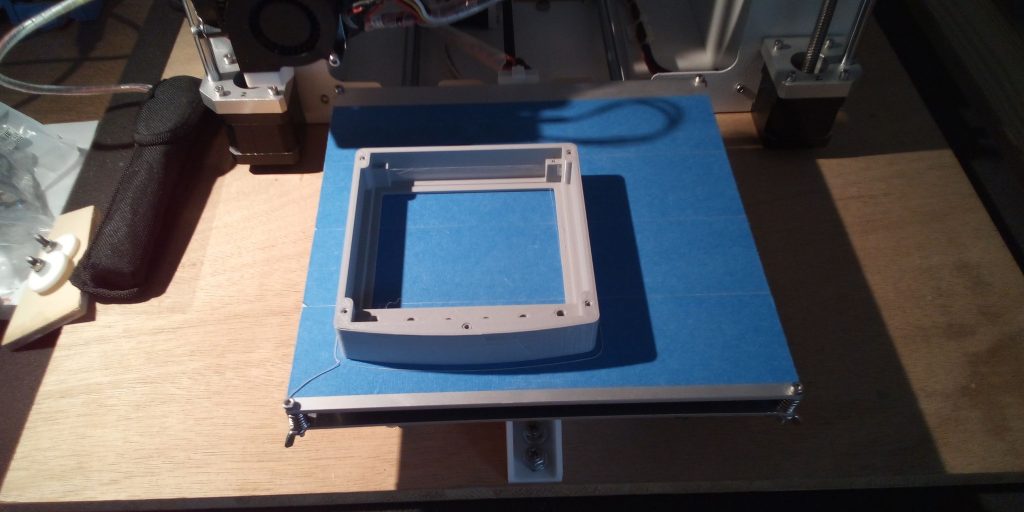
Fig. 3D printing process
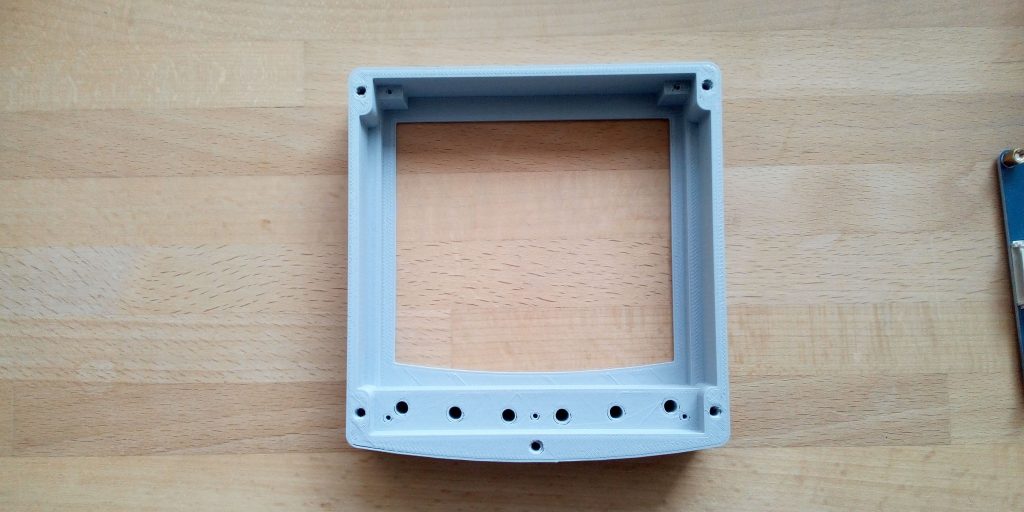
Fig. 3D front housing
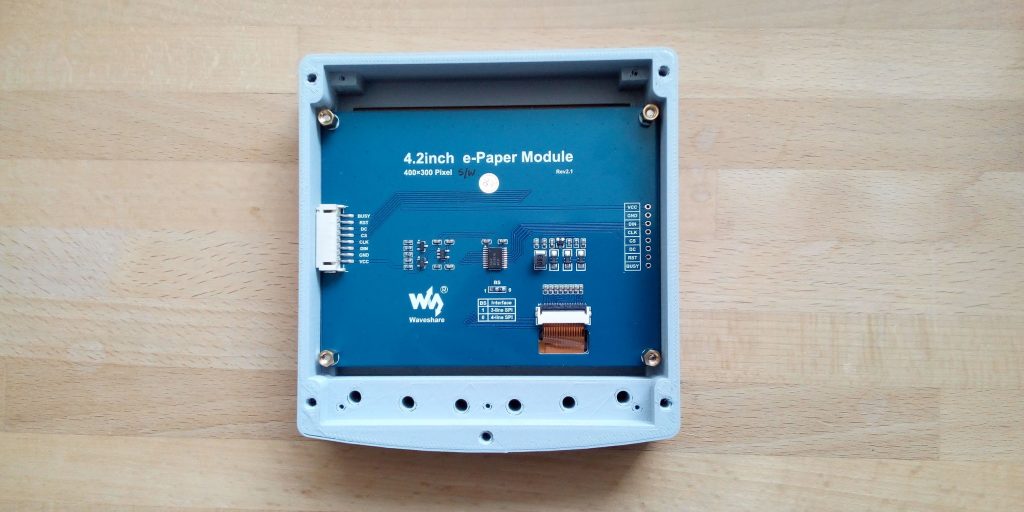
Fig. Front housing with e-ink display
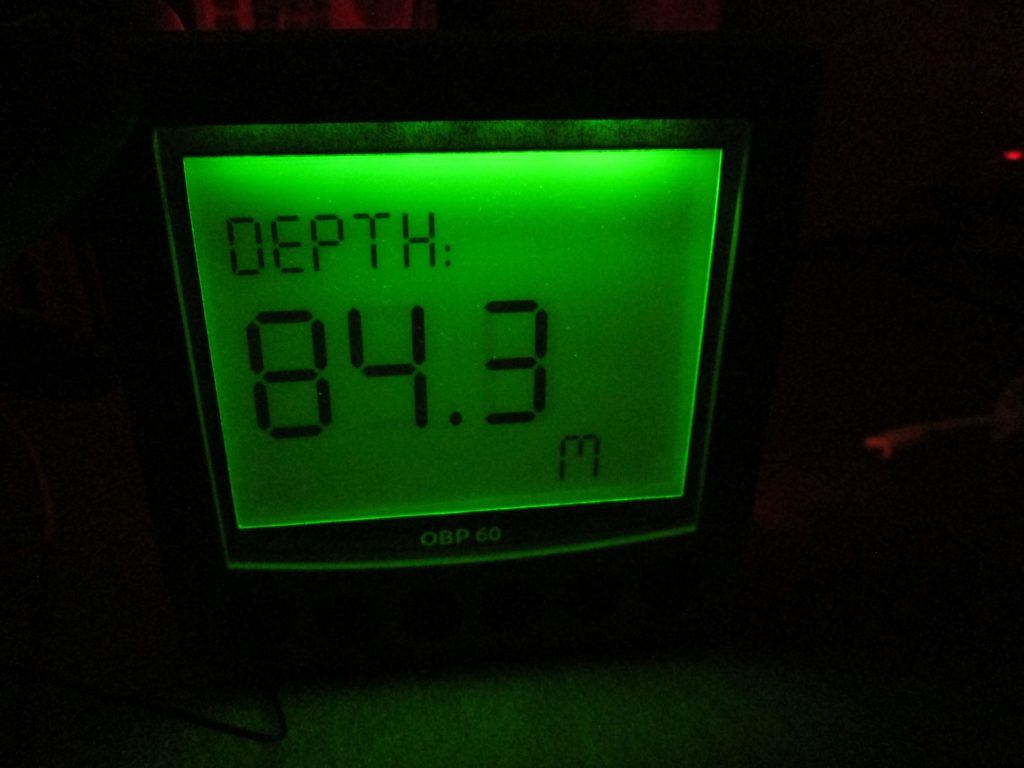
Fig. Illuminated e-ink display