Fig. Shelly 1
Anyone who anchors is obliged to set an anchor light so that you can be recognized on the open water surface in the dark. Typically, the light is switched on manually at dusk and off again at sunrise. There is no problem switching it on. But you often forget to switch it off and the anchor light is then permanently on and consumes electricity unnecessarily.
With a Shelly 1, an automatic anchor light can be built that can switch the anchor light on and off independently. To do this, the Shelly obtains the time from the Internet and calculates the sunrise and sunset times and switches the anchor light accordingly. For this to work, the following conditions must be met:
- Shelly V1 or V3 with original firmware
- Permanent WiFi connection to the internet via port WiFi or mobile internet router to get the current time
- Permanent power supply of the Shelly 1 with 12V (0.08W stand-by relay off, 0.2W relay on)
- Connection of the switching contact from the Shelly with the switch for the anchor light (parallel connection)
The project is aimed at laypeople with little experience. The Shelly does not have to be modified or rebuilt for this. It is used as purchased and the main work is to configure the Shelly and connect it to the boat's electrical system. No major modifications will be made to the existing electrical system and an existing switch for the anchor light can continue to be used as before. The instructions presented here only work for the Shelly 1 V1 and V3. The Shelly 1 V2 cannot be used because the switch contact is not potential-free.
Basically, the Shelly can be used in two operating modes. Once with a cloud connection and once without a cloud connection. A cloud connection is not necessary for our project and the automatic anchor light also works without it. If you want to control or switch the anchor light from home via the Internet, you can also use the cloud. If you enjoy it, you can also use the Shelly1 via the cloud Control Amazon Alexa or Google Home with voice commands. The following description shows how to prepare the Shelly for the automatic anchor light.
Table of contents
Set Shelly to 12V supply
When delivered, the voltage selector is set to 230V AC. We have to set the jumper to the position for 12V according to the picture and supply the Shelly with 12V via N and L. But watch out! N is not equal to ground but 12V, whereas L is ground. On average, the Shelly consumes only 0.08W when the relay is not activated. However, this only works if the latest firmware V1.11.8 or newer installed and Eco mode activated.
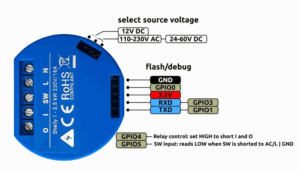
Fig: Meaning of the pin headers
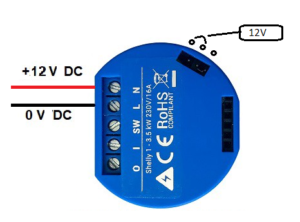
Fig: Assignment of the supply voltages for 12V
Bring Shelly 1 into your own network
How this works in detail is explained in Shelly–Documentation sufficiently well described. A static IP address does not have to be assigned. The field can remain disabled. If a usable port WiFi is available, you can use its login details. In order to be able to use the automatic anchor light regardless of location, we recommend connecting to the Internet via a mobile UMTS or LTE router. Alternatively, a disused mobile phone can also be used in hotspot mode.
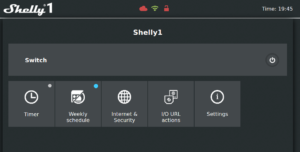
Fig: Start page
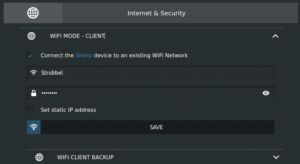
Fig: Internet & Security page
Danger! You have to be careful when entering the network parameters. If you entered the WiFi SSID or password incorrectly, you will lock yourself out and no longer be able to connect to Shelly. A hard reset to factory settings is only possible via a cumbersome procedure. To do this, you have to switch the power supply off and on again and then press the switch at the SW input 5 times within one minute. The right timing is a matter of luck and requires several attempts to be successful. In the worst case, the Shelly can no longer be activated and you have to flash the firmware again. How to do that is in this one Flash guide described.
After the Shelly is in the network with Internet access, you should update the firmware, since the Shelly has been on the market for a long time and some models with old firmware are still available. The latest firmware offers some more functionalities and has been corrected for errors. The firmware update can be found at Settings ->Firmware update make.
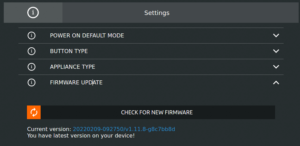
Fig: Firmware update
Set the source of the system time
By default, the time is automatically fetched from the Internet and the correct time zone is set, provided there is an Internet connection. At the top right of the start page you can check whether the system time is set correctly. If this is not the case, you can go to Settings -> Time Zone and Geo Location make the necessary settings.
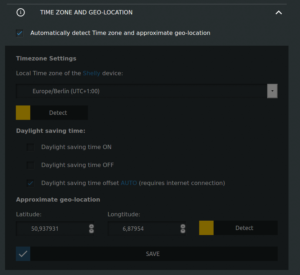
Fig. Setting the source of the system time
The Shelly does not require a permanent internet connection to update the time. It is sufficient to fetch the system time from the Internet once after the start. A port WLAN is completely sufficient. The time continues to run in Shelly even without internet. However, you should be careful not to switch off the Shelly without an Internet connection, otherwise the time cannot be fetched when you restart and the switching function can no longer be carried out correctly.
Set switching function
Via the configuration page Weekly schedule the switching function for the anchor light can be set. A timer is added for switching on and off and fixed times are set, or you can also use the sunrise and sunset times as a source. This is very practical, as the switching times are automatically adjusted to the actual position of the sun. If you want, you can change the switching times individually with an offset.
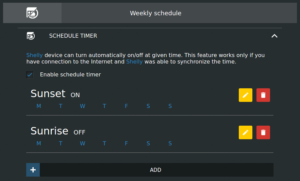
Fig: Set switching functions for sunset and sunrise
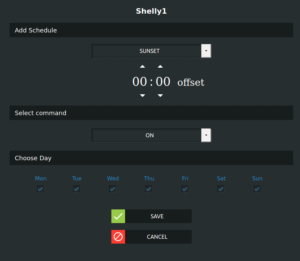
Fig: Settings for sunset
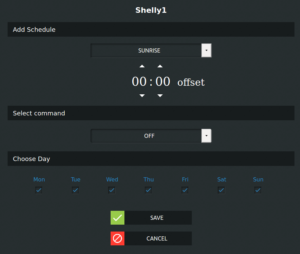
Fig: Setting for sunrise
Automatic anchor light circuit
Depending on the type of Internet access for the Shelly, you must either connect the power supply of the Shelly directly to the main switch or you can use a group switch on the control panel such as the refrigerator switch. The Shelly's potential-free switching contact is switched on the control panel in parallel with the switch for the anchor light. You can switch the anchor light either via the Shelly or directly via the switch on the control panel, whereby the switch on the control panel always has priority and can override the switching status of the Shelly. There is a problem though, when the Shelly has the anchor light on, you can't turn it off with the switch on the control panel. Either you then de-energize the Shelly or deactivate the switching states in the Shelly.
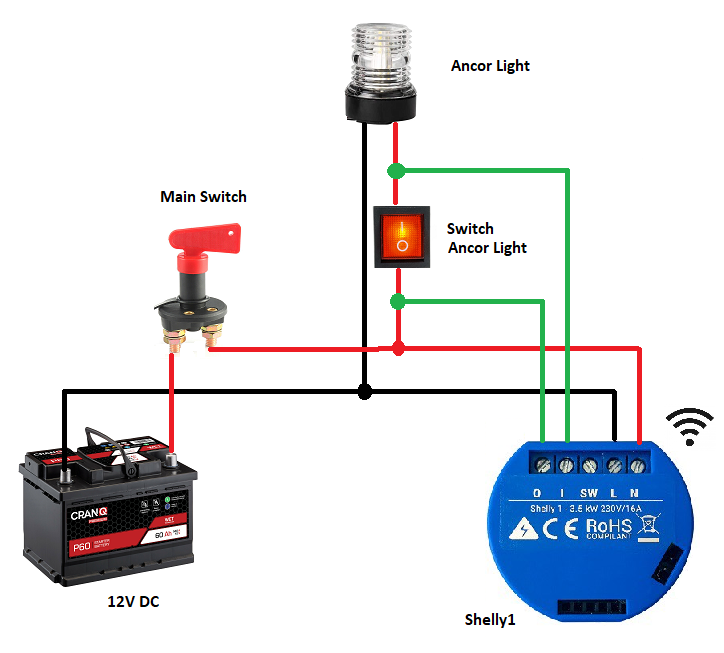
Fig: Automatic anchor light circuit
Additional information
A few other functions on board can be automated in a similar way, such as heating, ventilation, battery charging or bilge drainage. Anyone who has activated the cloud connection can then also control all functions remotely via the Internet and, if necessary, be informed by e-mail. For the Shelly 1 can be found at Thingiverse 3D printing templates for a DIN rail holder. In this way, the installation can be carried out professionally in a sub-installation.
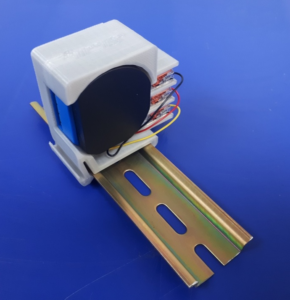
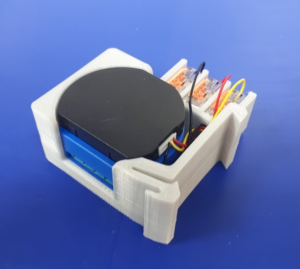
Fig: DIN rail holder for Shelly 1 with temperature addon module
Here is some additional information about Shelly: