Keypad extension for OBP multifunction devices via NMEA2000.
Table of contents
motivation
Example: Two OBP40s are installed as display instruments. To achieve waterproofing, they are mounted behind a glass panel. An external keypad is required to operate both devices.
-
NMEA2000 wired keyboard, designed for permanent installation
-
The device should be waterproof.
-
Six buttons, like those on the OBP60, should be used.
-
The keys should be "real" keys that provide good haptic feedback and can be located by touch.
-
A key press optionally provides acoustic feedback.
-
The keyboard should be able to be dynamically paired with different target devices.
-
Configuration via a web interface
-
DIY-friendly
Quick Guide
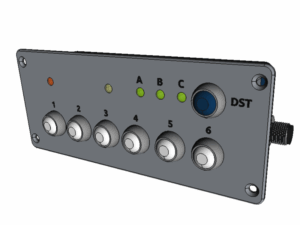
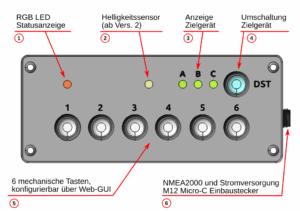
The device consists of the following components
-
Status LED: this can assume different colors
- Brightness sensor (from version 2 onwards)
-
Destination Display (DST): Shows which device the key presses should be sent to.
-
Destination selection button: To switch between the individual destinations (A, B or C)
-
Keys 1 to 6: Send a configurable key code to the destination.
-
M12 Micro-C connector: This is where the NMEA2000 cable is connected.
Installation
-
Connection to the NMEA2000 network
-
The device starts automatically; the status LED lights up red for informational purposes.
-
An internal test follows, in which all LEDs light up once.
-
Target A is selected, the corresponding LED is lit green.
-
The status LED flashes briefly once every 5 seconds.
-
If a temperature/humidity sensor is installed, it sends the measured values to the NMEA2000 network at regular intervals.
Configuration via web GUI
-
Connect to the Wi-Fi
OBPKP61, passwordkeypad61 -
Accessing the address
192.168.15.1 -
Accessing the page
Config -
Make the desired settings
-
Save, the device will restart automatically.
Three destinations can be configured for the key codes. The OBPkeypad 6/1 retrieves a list of devices present on the NMEA2000 network. These can be assigned to destinations A, B, and C. It is possible that not all or no devices will be displayed immediately after power-on. In this case, simply wait a while.
Configuration mode
To switch from normal operation to configuration mode, press and hold the destination button for more than 3 seconds. The status LED will light up blue after you release it. In this mode, buttons 1 through 6 each have a special function:
| button | function |
|---|---|
| 1 | Day/night mode switching |
| 2 | Switch acoustic signals on/off |
| 3 | Access Point On/Off |
| 4 | - |
| 5 | Restart (reset) device |
| 6 | Put the device into deep sleep mode. Wake up by pressing the destination button |
To exit configuration mode, press and hold the target selection key again for more than 3 seconds. When the status LED is no longer blue, the keypad is in normal mode.
Turn off
The OBPkeypad 6/1 is designed to be switched on and off using the NMEA2000 bus.
If it is not needed during operation, it can be put into deep sleep mode. To do this, switch to configuration mode and then press the button. 6 Press. The blue LED will flash to confirm, and then all indicators will turn off.
To restart, press the destination selection button once.
Development
hardware
electronics
-
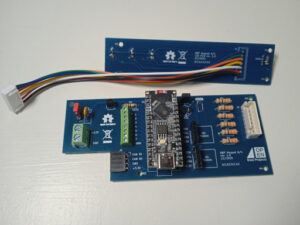
Main and LED board, version 1.0 Based on a Waveshare ESP32-S3 Nano
-
can be operated directly on 12V (6-21V input)
-
-
6 buttons (1 to 6)
-
+1 button for destination selection (DST)
-
3 LEDs for destination display (A, B, C)
-
1 RGB LED for status indication
-
1 buzzer for acoustic key feedback
- 1 brightness sensor
-
NMEA2000 / CAN
- SN65HVD230 CAN transceiver module
- M12 Micro-C panel mount connector, pre-wired (su)
-
I²C slots
-
2x 4-pin socket strip
-
1x Temperature / Humidity Sensor SHT31
- 1x free
-
- 1x qwiic connector (3.3V; SMD)
-

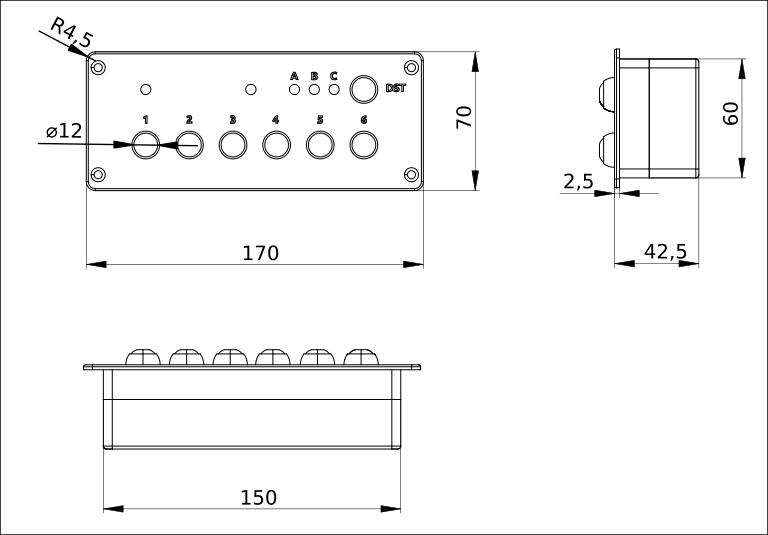
casing
The current housing design is intended to be recessed into a surface. The raised edge all around facilitates this. A watertight seal can be achieved using a surrounding sealant/adhesive. In this case, the screw connection is likely unnecessary. Alternatively, a foam rubber ring or similar material could also be used.
The existing prototype is a 3D-printed (PLA) front and back panel. The front panel is three-colored: the base color of the casing, transparent for the LED cover, and black for the lettering. A fourth filament is required as support filament to cleanly print the 1mm round recess for the key seal.
All internal connections are made with M2.5 screws. In the final housing, the housing connection should be fitted with threaded inserts. M4 countersunk screws are provided for mounting the housing.
Sealing between the front and back is not actually necessary, however a silicone foam cord is provided between the housing halves.
software
-
PlatformIO is used, just like in the other OBP projects.
-
It is programmed in C++
- License GPLv3
-
The device is a simple The device receives a newly developed firmware.
-
The web configuration interface is based on the operation of the OBP60/40.
-
Various types of keystrokes can be evaluated.
-
Pressed briefly, for less than 1 second
-
medium, pressed for between 1 and 3 seconds
-
long, pressed for more than 3 seconds
-
-
There should be a day and night mode.
Project status
- PCB version v2.0 is available
- Fixed a bug in the buzzer connection.
- Built-in brightness sensor
- Improved cable connection for the keys
- A printable case variant exists, printed on a Bambu Lab A1 mini.
- Latest firmware for the OBPkeypad 6/1
- Keystrokes can be sent
- The temperature/humidity sensor sends data to the NMEA2000 bus.
- Configuration mode available
- Web GUI is generally functional
- Web update function works (error messages may still need to be corrected)
- Firmware is actively under development
- On the receiving side, the remote keypad capability must be integrated into the OBP60 firmware.
- A manual patch is currently required.
outlook
- Additional software features
- The buzzer could be used to output NMEA2000 alarms.
- Additional Hardware Features
- Voltage measurement at the 12V input
- EEPROM on the board for static "unchangeable" values that should not be stored in the flash memory of the replaceable MCU module.
Files/Links
Warning: This project is still in its early stages; changes may occur at short notice. Therefore, please always check the version number.
Firmware: Source code
→ https://git.hoogi.de/thooge/OBPkp61
3D printing files: FreeCAD
→ https://www.hoogi.de/obp/OBPkeypad61.FCStd
Assembly tools: FreeCAD
→ https://www.hoogi.de/obp/OBPtool16.FCStd – Tool for 12mm keys
→ https://www.hoogi.de/obp/OBPtool18.FCStd – Tool for M12 Micro-C
Circuit board data: KiCAD
→ https://www.hoogi.de/obp/OBPkeypad61_PCB.zip
Flyer, German: OBPkeypad 6/1 Flyer
Have fun with the device!