First of all, a few important notes that you should definitely pay attention to.
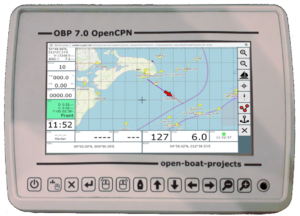
Fig. 7 ″ OBP 7.0 OpenCPN plotter
After Chistian made a first attempt at a 10 ″ self-made plotter had undertaken, a new approach for a new self-made plotter emerged. Some points in the old concept had proven impractical. In particular, the use of a Raspi Compute Module CM3 and its discontinuation had brought the old project into serious difficulties. The base board should have been completely redesigned. At the end of 2021 Christian undertook a new approach for a 7 ″ plotter. A 10 ″ plotter with the same approach should also follow.
concept
This time should be a Standard Raspberry Pi 4B serve as a base. On the one hand, the standard Raspi already has all the essential functions on board and, on the other hand, it is much easier to get.
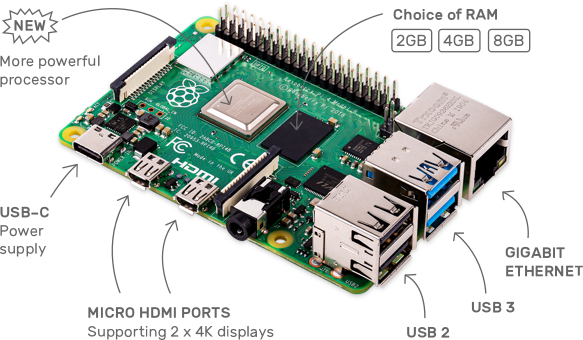
Fig: Raspberry Pi 4B (Raspberry Pi Fondation)
Since all expansion boards are docked via the post connector, the new plotter is also compatible with newer Raspi versions. The old Raspi 3B can also be used in the plotter. The aim of the new development is to keep the hardware expenditure as low as possible and to get along with commercially available components as far as possible. The number of additional boards should be kept to a minimum. In particular, the use of a commercially available weatherproof housing saves the time-consuming milling work for an adapted housing. A very simple assembly concept is implemented through a layered structure with frame parts. The aluminum parts and the housing processing can also be made by hand and do not necessarily require CNC processing. The aim is to offer assembled boards and prefabricated mechanical parts as a kit.
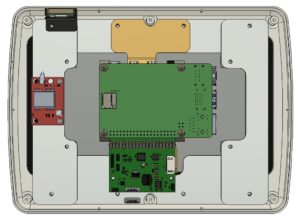
Fig: Device structure, rear view
The device structure takes place in several layers. The bottom layer is the front frame with the display. The control electronics are located on the back of the display. There are 4 studs on the circuit board onto which the Raspberry Pi 4B can be screwed. The control electronics of the display are connected to the Raspberry Pi via flexible strip conductors. To attach the display to the housing, there is a base frame with two side parts to which the display can be screwed using the four brackets. The two side parts on the base frame are necessary in order to optimally utilize the overall depth in the housing. The orange metal part on the top is a cold finger that dissipates the CPU heat to the aluminum frame and thus cools the CPU effectively without having to use a CPU fan. The red circuit board on the left is a GPS receiver, which can be purchased as a ready-made electronic module in electronics stores.
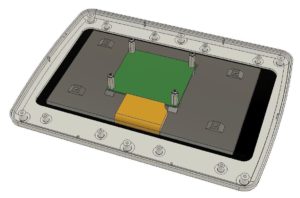
Fig. Front cover with 7 ″ display
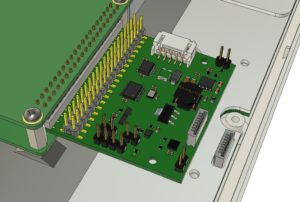
Fig. Expansion board
The expansion board below the Raspberry Pi contains the power supply, an audio amplifier and the connections for the keyboard, the GPS receiver and the loudspeaker as well as the driver for the CAN bus for NMEA2000.
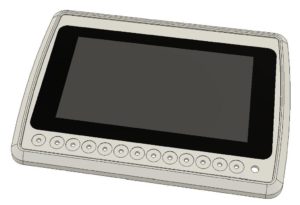
Fig. Front view without cover film
The cutouts for the buttons, the display and the IR receiver are located on the front. The front cover is covered with a foil printed on the back. The printing creates the lettering and the adhesive prevents water from penetrating.
The 7 ″ plotter consists of only a few hardware components:
- Plastic housing, two-part, ABS, waterproof (gray or black)
- 7 ″ touch display 800 x 480 pixels, 400 nits
- Raspberry Pi 4B, 4 GB Flash, Quad-Core 1.2 GHz
- Expansion board with power supply for 12V with NMEA2000 CAN bus adapter
- Keyboard board
- GPS receiver with antenna
All parts except for the expansion board and the keyboard are commercially available. If you use AVnav as an image for the Raspberry Pi, you don't necessarily need the keyboard and expansion board, because AVnav can only be operated via touch and commercially available DC / DC converters can also be used as power supply.
software
Raspberry Pi OS Buster is the operating system on a 32GB SD card that is inserted into the Raspi. Christian has created two image versions. Once for AVnav and once for OpenCPN as navigation software. The software variants differ in terms of usability and support the special features of the navigation software. While AVnav is fully browser-based and uses touch operation without keys, OpenCPN, on the other hand, is a desktop application that is operated with a mouse and keyboard. In order for OpenCPN to be operated without a mouse and keyboard, some control buttons are required in the plotter. The most important OpenCPN key functions such as zooming and various views have been assigned to plotter keys. There are also some software extensions for Raspberry Pi OS Buster. Christian also has customized ones IR remote controls built with a mouse emulation that you can use.
implementation
A CNC milling machine was used to machine the housing parts. A special assembly frame was created in which the raw parts can be inserted so that the housing half-shells could be firmly mounted on the processing plate without tension during processing. This also ensures that the parts cannot slip during processing.

Fig. Assembly frame for CNC machining
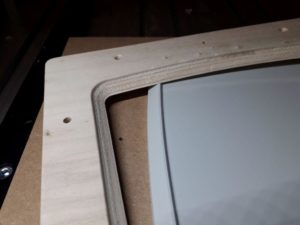
Fig. Negative form
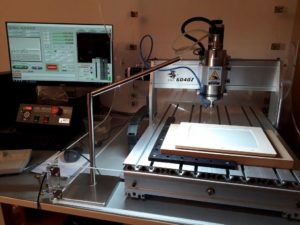
Fig.CNC milling machine 6040Z

Fig.Milled parts for the mounting frame (attached to the sacrificial plate with double-sided adhesive tape)
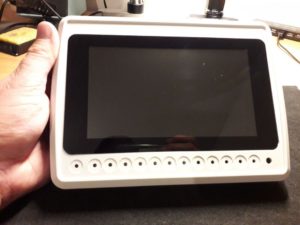
Fig. Milling result of the front frame
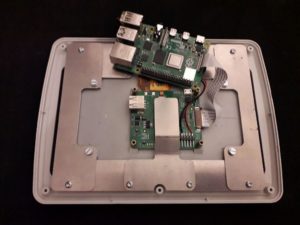
Fig.Layer structure (below TFT board, above Raspi)

Fig. CPU cold finger for the Raspi
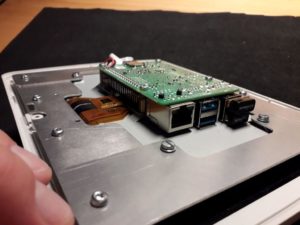
Fig. Raspi mounted, 2 USB ports occupied by WiFi and mouse / keyboard sticks
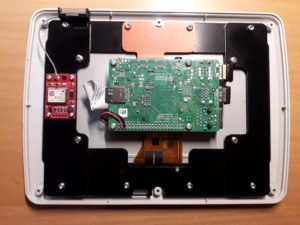
Fig. Painted sheet metal
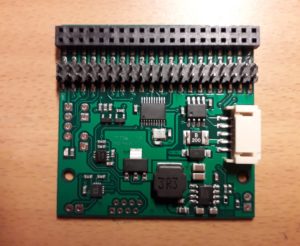
Fig. Circuit board for power supply, for connecting the peripherals and the NMEA2000 bus
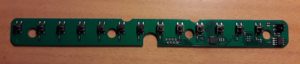
Fig. Keyboard board
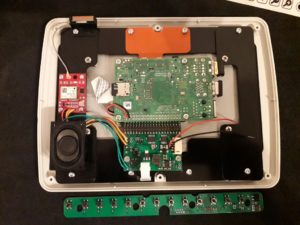
Fig. Entire structure with GPS receiver and loudspeaker
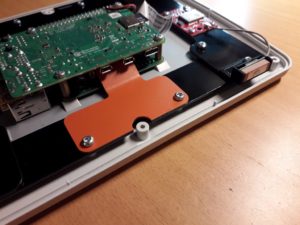
Fig. Cold finger and GPS antenna
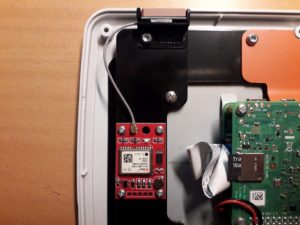
Fig.GPS receiver Ublox NEO 6M
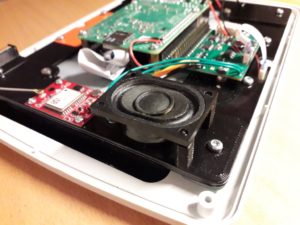
Fig. Loudspeaker bracket
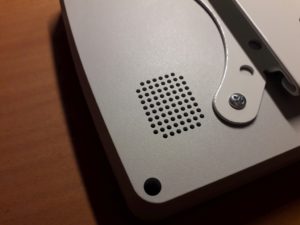
Fig. Cutouts for loudspeakers (sealing with Goretex)
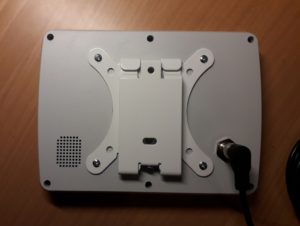
Fig. Rear side with Vesa mount and NMEA2000 connection

Fig. Experiments with different front foils